Meet the Purple Ace!

Meet the Purple Ace!

Monday, June 12, 2017

Dexter Final Update! ZBrush model by Audrey C. Everett


Concept by yours truly, Audrey C. Everett
 
1. Made some adjustments to his boots and cleanup his anatomy on his pinky. 2. Using the "hPolish" brush from ZBrush, I was able to get this crisp edges I was aiming for with his stylized hair, compared to before (it was too soft, smooth). Yeah, this is more like it!


Saturday, June 10, 2017

ZBrush Model of Dexter (Reborn)! Update.

I've come to realize, I haven't posted any progress of my model of "Dexter" (as a real boy) from Cartoon Network's Dexter's Laboratory. For my Pre-Production Team class, I teamed up with one of my peers Anna Vo to do a 3D Recreation of Dexter AND his Laboratory. As you can see below, I snapped MANY pictures of my progresses, so as you scroll down, you'll see my results down to where I FIRST began. Enjoy looking at my progress journey!


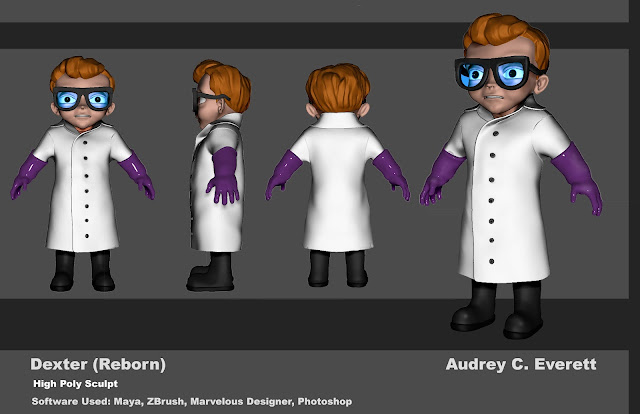
DEXTER (REBORN) Highpoly Sculpt Model by Audrey C. Everett


Here is where I went ahead to start a ROUGH model inside Maya to see which route I wanted to go with Dexter, along with fitting Anna Vo's environment style. (BUT I SCRATHED THIS IDEA, AND DECIDED TO GO ANOTHER ROUTE).


Below, I where I drew my first concept design of my recreation for Dexter, BUT I took this reference, and modeled a quick spin-off a to get a general basic idea of how I wanted him to turn out, along while keeping the mixture of Disney style involved.
Began with a little boy, baby BASE mesh from Maya, quaddrawed the boots, gloves, and glasses to have ready for import in ZBrush GO. (AND OMG, HE LOOKS LIKE A FREAKING BABY LOL) this is not the final result whatsoever. A lot of changes needs to be made: Make head shape more round, too much muscle in his arms and legs, and to make the glasses more stylized (goggles-like) in the first reference at top left.


So below is where I imported the highpoly combined-mesh from Maya, into MARVELOUS DESIGNER as an Avatar (so easier application of morphing the clothing to my model) I started by creating a lab coat clothing pattern where I can sew the pieces together and have a realistic appeal of naturally, behaved wrinkles etc.).


THE COLLAR WAS A PAIN TO DO AT FIRST, THEN I JUST WENT AHEAD TO LOOSEN UP HIS COLLAR A BIT TO ADD A LITTLE STYLE TO DEXTER'S LAB COAT.


I SIMULATED AGAIN, AND GOT GOOD RESULTS. Took this file, went up to the 3D Garment tab, and Quadrangulated the coat mesh for easier topology in ZBrush, and saved as OBJ.


After exporting the lab coat, I imported it into the Dexter's Brush file to make some adjustments accordingly. Buttons are slightly off-positioned, but that's an easy fix. And oh yeah, these glasses are totally WAY BETTER :)


HERE BELOW IS WHERE I WAS LEARNING HOW TO USE THE "FIBERMESH" IN ZBRUSH TO CREATE REALISTICALLY STYLIZED HAIR FOR DEXTER. This was a tedious process being that it was my first time doing so, but after while I went ahead and sculpted it to fit its stylized goal for gaming production.


BUT OVERALL, COLOR CORRECTION AND CLEANUPS ARE SO IMPORTANT!!! (Thank goodness I was aware of my errors lol). He's coming along wonderfully, don't you think!?


Friday, April 28, 2017

Quick Incorporation of the Assets

Although I wish I could've done him in Substance Painter, here is where I've modeled and unwrapped my mini assets (ex. the clock, dynamite, and bomb) and applying a quick paint in ZBrush. Exported my Normal, AO, and Texture Paint Maps for texture application in Marmoset. These assets should round up to a good 3,000 quads; just enough to make my contract of retaining a 8K-12K polycount, but a lot needs to be done.


Wednesday, April 26, 2017

Final Presentation of Clocksworth

A lot has changed. A lot has happened. A lot has become ugly. Its Clocksworth lol. Here is my Final Presentation of my model that had to be 8,000-12,000 Quads. And without the tiny props on his hat (the bomb, dynamites, and clock), my Polycount came to just about 8,000 Quads, so I'll definitely have more than enough geometry to go off of for completing my assets. I imported my (soften normals) OBJ character meshes, and applied all of my merged UV maps: Color, Occlusion, and Normals into Marmoset. Here I was able to create a 3-point lighting, snap turn-around photos, and render out a turn-around with Wireframe. 


TEXTURE PAINT MAP (TM)      OCCLUSION MAP (AO)               NORMAL MAP (NM)


ATTEMPTING THE BOMB IN SUBSTANCE PAINTER... (now learning)


Tuesday, April 25, 2017

Texture Painting on Lowpoly Projections

After I projected my highpoly detail to my lowpoly retopos, I was able to start painting onto my lowpolys for easy export and lowpoly count. I actually like this process: The Painting process in ZBrush, or in any program even. This is the part where I'm able to apply what I know about painting here and showing that "details matter". I attached here below some screenshots of a turn-around where I was painting onto my Lowpolys (already high-projected) working inside ZBrush. 


Monday, April 24, 2017

Retopology in Maya (retaining polycount_

Here I began my retopology with consideration of my polycount to be 8,000-12,000 Quads, I was able to achieve this within the character of only 8K now, so that way, I'll have 3K left of the mini lowpoly assets, which will come much later on. Finishing my retopo, imported these into ZBrush and began my highpoly projections to my lowpoly retopos.


Sunday, April 23, 2017

Creating the Tie & Cloak in Marvelous Designer

Back at it again with Marvelous! Working on importing my decimated high-poly hat into MD where I can create the cloth material for it (this will help lower my poly count too). Started to do the Cloak and Tie in Maya, but what the hey. I may as well keep the realistic clothing look, right? Let's hope time doesn't catch up with me.


Dexter Final Update! ZBrush model by Audrey C. Everett

Concept by yours truly, Audrey C. Everett   1. Made some adjustments to his boots and cleanup his anatomy on his pinky. 2. Using th...